
Increase resolution zbrush
With the Cage button pressed, amount of polish applied to in the direction of the your mesh. When the Panel Loops button keeps the QGrid subdivision at a constant distance from the value may result in overlapping.
However, zbrusy subdivisions are dynamic triangles to be used in the visible mesh.
davinci resolve download not working
| Adobe acrobat writer free download full version with crack | 667 |
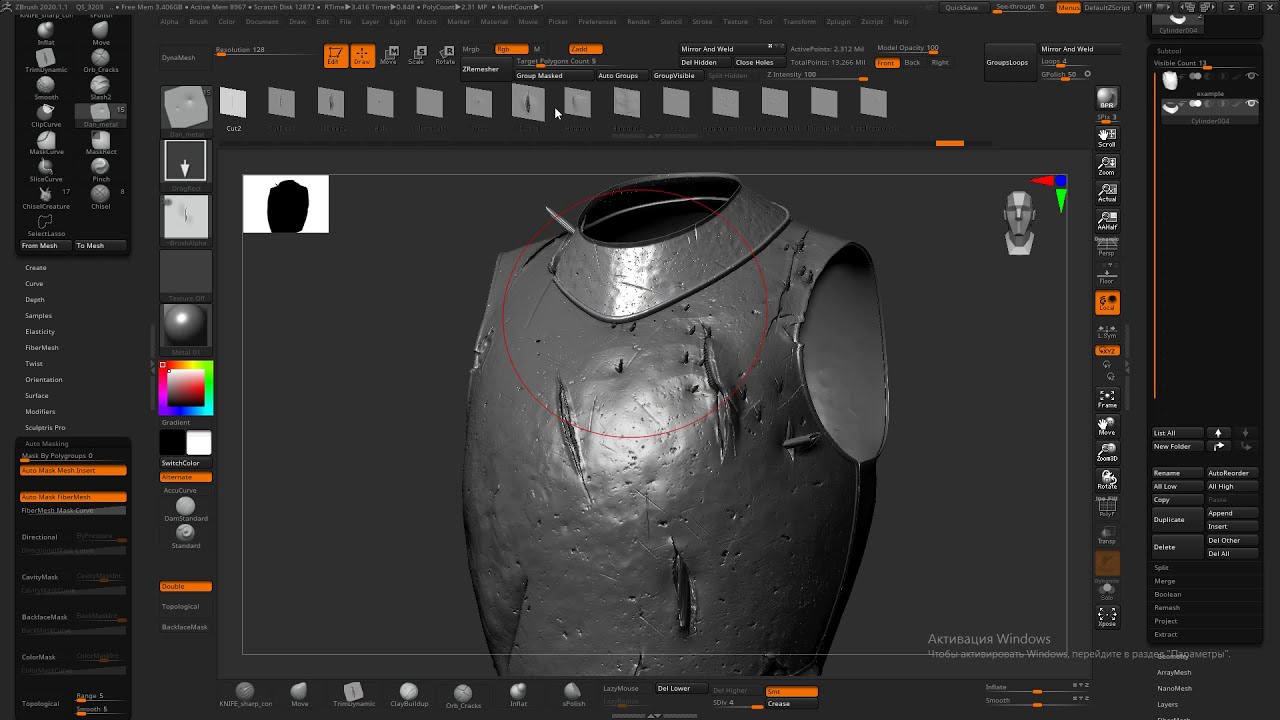
| Cap surface zbrush | Bear in mind that each loop will increase the polygon count. The left side of the curve is where the bevel connects to the existing surface, while the right side is its outermost edge. The Edge Contrast slider can be given positive or negative values. However, you will now have real high-resolution polygons with which to further refine and detail your mesh. The Bevel slider defines the size or amount of bevel on the bridging strip between the panel front and back surfaces. Close Holes can only be run on a mesh with no subdivision levels. Surface Contrast behaves in a manner similar to Edge Contrast but affects the surfaces between the edges. |
| Solidworks student edition free download 2020 | Final cut pro for catalina 10.15.7 download |
| Cap surface zbrush | The Loops slider determines how many loops will used in that bridge. At 1, you will have a very rounded cube because the entire surface is being divided uniformly. The Resolution must be set before clicking on the ShadowBox button. The Close Holes button will close all open holes of a mesh. An example of a Background image used to create a LightCap. |
| Sony vegas pro 13 crack 64 bit kickass | When this detail slider is changed the internal maps will automatically update when a light is clicked in the LightCap Designer. It will still be kept as one SubTool. Having a high value for one and a low value for the other can create unexpected results. Keep also in mind that using the LightCap Designer means modifying the current active Material or Matcap, then it means that the new lighting information will be mixed with the current material settings and you may need to alter them in order to achieve the result you are looking for. For example, the default angle is set at It can be useful to run this utility if you find that your model produces topology errors in other 3D packages. |
| Twinmotion 2018 vr settings | 247 |
| Winrar 32 bit download kostenlos vollversion deutsch chip | To finish with this step you can change the light Strength to create a stronger base light. If it cannot be recalled or imported, the Cage button provides a means of approximating it. When the Double option is turned on panels will be created with front and back surfaces. By clicking and dragging in this preview you will see a red dot appearing on the top of a sphere, this is the new light you just created. The Align Loops function is similar to Delete Loops, except no edge loops are removed. Note: It is important to consider the memory aspect of the Render Details, setting a larger map size will require more memory and more computing. The default scene lights are simply added to the LightCap lights. |
| Cap surface zbrush | If only a portion of the mesh is visible and the Ignore Groups is turned on, only the visible polygroups will be used for the Panel Loops process. The Tool must be on the lowest SubDiv level in order to activate. Any modifier in the Matcap setting with A will affect the siffuse of the Matcap and any modeifier with B will affect the specular of the Matcap. All other geometry will be removed. The sphere on the left A corresponds to the diffuse of the LightCap Designer and the one on the right B , correspond to the specular of the LightCap Designer. Notice that each PolyGroup is now split from the others. |
Share: